LOST Quick Setup
LOST provides a quick_setup script, that will configure LOST and instruct you how to start LOST. We designed this script for Linux environments, but it will also work on Windows host machines.
The quick_setup will import some out-of-the-box annotation pipelines and example label trees. When you start LOST, all required docker containers will be downloaded from DockerHub and started on your machine. The following containers are used in different combinations by the LOST quick_setup:
- mysql ~124 MB download (extracted 372 MB)
- rabbitmq ~90 MB download (extracted 149 MB)
- lost ~1 GB download (extracted 2.95 GB)
- lost-cv ~3 GB download (extracted 6.94 GB)
- lost-cv-gpu ~4 GB download (extracted 8.33 GB), an nvidia docker container
There are three configurations that can be created with the quick_setup script:
- A standard config that starts the following containers: mysql, rabbitmq, lost, lost-cv. In this config you are able to run all annotation pipelines that are available. Semi-automatic pipelines that make use of AI will be executed on your CPU.
- A minimum configuration that starts the mysql, rabbitmq and lost container. This conifg may only run simple annotation pipelines that have no AI included, since there is no container that has an environment installed to perform deep learning algorithms. This setup will required the smallest amount of disc space on your machine.
- A gpu config that will allow you to execute our semi-automatic AI annotation piplines on your nvidia gpu. The following containers will be downloaded: mysql, rabbitmq, lost and lost-cv-gpu.
Standard Setup
- Install docker on your machine or server:
- Install docker-compose:
- Clone LOST:
git clone https://github.com/l3p-cv/lost.git
- Run quick_setup script:
cd lost/docker/quick_setup/
# python3 quick_setup.py path/to/install/lost
# If you want to install a specific release,
# you can use the --release argument to do so.
python3 quick_setup.py ~/lost
- Run LOST:
Follow instructions of the quick_setup script, printed in the command line.
Minimum Setup (LOST only)
Note
No semi-automatic pipelines will be available for you. So almost no magic will happen here ;-)
- Install docker on your machine or server:
- Install docker-compose:
- Clone LOST:
git clone https://github.com/l3p-cv/lost.git
- Run quick_setup script:
cd lost/docker/quick_setup/
# python3 quick_setup.py path/to/install/lost -noai
# If you want to install a specific release,
# you can use the --release argument to do so.
python3 quick_setup.py ~/lost -noai
- Run LOST:
Follow instructions of the quick_setup script, printed in the command line.
LOST + GPU Worker
Note
You will need a nvidia GPU to use this setup. This setup will also assume, that LOST and the GPU worker are running on the same host machine.
- Install docker on your machine or server:
- Install docker-compose:
- Install nvidia docker:
- Install nvidia-docker2:
sudo apt-get update
sudo apt-get install docker-ce nvidia-docker2
sudo systemctl restart docker
- Clone LOST:
git clone https://github.com/l3p-cv/lost.git
- Run quick_setup script:
cd lost/docker/quick_setup/
# python3 quick_setup.py path/to/install/lost -gpu
# If you want to install a specific release,
# you can use the --release argument to do so.
python3 quick_setup.py ~/lost -gpu
- Run LOST:
Follow instructions of the quick_setup script, printed in the command line.
Install LOST from backup
Perform full backup with sudo .. code-block:: bash
sudo zip -r backup.zip ~/lost
- Install docker on your machine or server:
- Install docker-compose:
- Clone LOST:
git clone https://github.com/l3p-cv/lost.git
- Run quick_setup script:
cd lost/docker/quick_setup/
# python3 quick_setup.py path/to/install/lost
# If you want to install a specific release,
# you can use the --release argument to do so.
python3 quick_setup.py ~/lost
sudo rm -rf ~/lost
unzip backup.zip ~/lost
5. Make sure that ~/lost/docker/.env file contains proper absolute path to ~/lost in LOST_DATA and proper LOST_DB_PASSWORD
- Run LOST:
- Follow instructions of the quick_setup script, printed in the command line.
Migration Guide from 0.0.6 to 1.1.0
- Make these changes to the database:
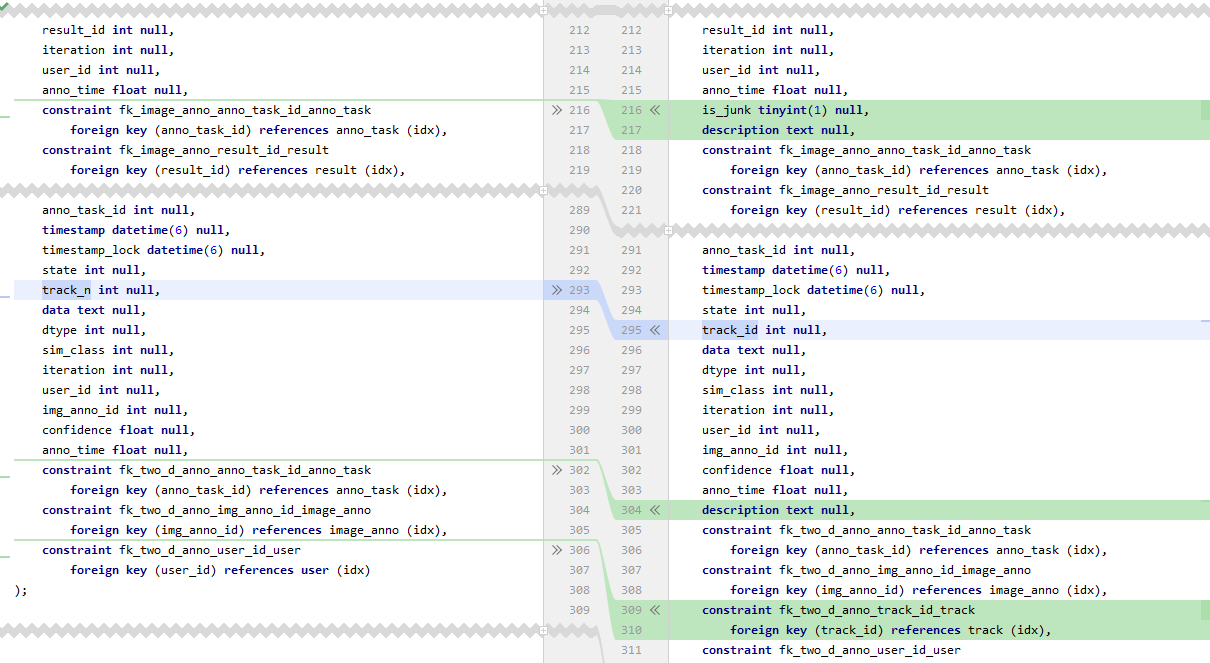
Figure 1: The the changes required to be made manually
2. Also you need to change your custom pipeline configuration files: backend/lost/pyapi/examples/pipes/<your_pipeline>/<config_file>.json
- Old unfinished tasks can become unfinishable so I recommend creating special user called ‘trash’ and for all unfinished tasks change lost.anno_task#group_id to ‘trash’ user group id from lost.user_groups.
- I recommend clearing lost.choosen_anno_task table.
Utf-8 char encoding fix
1. Convert database to utf-8: https://www.a2hosting.com/kb/developer-corner/mysql/convert-mysql-database-utf-8
- Or run on lost database
SET foreign_key_checks = 0;
ALTER TABLE anno_task  CONVERT TO CHARACTER SET utf8 COLLATE utf8_general_ci; SET foreign_key_checks = 1;
ALTER TABLE choosen_anno_task  CONVERT TO CHARACTER SET utf8 COLLATE utf8_general_ci; SET foreign_key_checks = 1;
ALTER TABLE data_export  CONVERT TO CHARACTER SET utf8 COLLATE utf8_general_ci; SET foreign_key_checks = 1;
ALTER TABLE datasource  CONVERT TO CHARACTER SET utf8 COLLATE utf8_general_ci; SET foreign_key_checks = 1;
ALTER TABLE `group`  CONVERT TO CHARACTER SET utf8 COLLATE utf8_general_ci; SET foreign_key_checks = 1;
ALTER TABLE image_anno  CONVERT TO CHARACTER SET utf8 COLLATE utf8_general_ci; SET foreign_key_checks = 1;
ALTER TABLE label  CONVERT TO CHARACTER SET utf8 COLLATE utf8_general_ci; SET foreign_key_checks = 1;
ALTER TABLE label_leaf  CONVERT TO CHARACTER SET utf8 COLLATE utf8_general_ci; SET foreign_key_checks = 1;
ALTER TABLE `loop`  CONVERT TO CHARACTER SET utf8 COLLATE utf8_general_ci; SET foreign_key_checks = 1;
ALTER TABLE pipe  CONVERT TO CHARACTER SET utf8 COLLATE utf8_general_ci; SET foreign_key_checks = 1;
ALTER TABLE pipe_element  CONVERT TO CHARACTER SET utf8 COLLATE utf8_general_ci; SET foreign_key_checks = 1;
ALTER TABLE pipe_template  CONVERT TO CHARACTER SET utf8 COLLATE utf8_general_ci; SET foreign_key_checks = 1;
ALTER TABLE required_label_leaf  CONVERT TO CHARACTER SET utf8 COLLATE utf8_general_ci; SET foreign_key_checks = 1;
ALTER TABLE result  CONVERT TO CHARACTER SET utf8 COLLATE utf8_general_ci; SET foreign_key_checks = 1;
ALTER TABLE result_link  CONVERT TO CHARACTER SET utf8 COLLATE utf8_general_ci; SET foreign_key_checks = 1;
ALTER TABLE role  CONVERT TO CHARACTER SET utf8 COLLATE utf8_general_ci; SET foreign_key_checks = 1;
ALTER TABLE script  CONVERT TO CHARACTER SET utf8 COLLATE utf8_general_ci; SET foreign_key_checks = 1;
ALTER TABLE track  CONVERT TO CHARACTER SET utf8 COLLATE utf8_general_ci; SET foreign_key_checks = 1;
ALTER TABLE two_d_anno  CONVERT TO CHARACTER SET utf8 COLLATE utf8_general_ci; SET foreign_key_checks = 1;
ALTER TABLE user  CONVERT TO CHARACTER SET utf8 COLLATE utf8_general_ci; SET foreign_key_checks = 1;
ALTER TABLE user_groups  CONVERT TO CHARACTER SET utf8 COLLATE utf8_general_ci; SET foreign_key_checks = 1;
ALTER TABLE user_roles  CONVERT TO CHARACTER SET utf8 COLLATE utf8_general_ci; SET foreign_key_checks = 1;
ALTER TABLE visual_output  CONVERT TO CHARACTER SET utf8 COLLATE utf8_general_ci; SET foreign_key_checks = 1;
ALTER TABLE worker  CONVERT TO CHARACTER SET utf8 COLLATE utf8_general_ci;
ALTER DATABASE CHARACTER SET utf8 COLLATE utf8_general_ci;
SET foreign_key_checks = 1;
- Change DB name in your .env to:
LOST_DB_NAME=lost?charset=utf8mb4