The LOST Command Line Interface
Login to a Docker Container
In order to use the LOST command line interface, you need to login to a lost docker container:
# Log in to the docker container.
# If your user is not part of the docker group,
# you may need to use *sudo*
docker exec -it lost bash
Managing Pipeline Projects
Import Project
After creating a pipeline it needs to be imported into LOST. In order to do that we need to copy the pipeline project folder into the lost_data_folder/my_data in your/host file system e.g:
# Copy your pipe_project into the LOST data folder
cp -r my_pipe_project path_to_lost_data/my_data/
Every file that is located under lost_data_folder will be visible inside the lost docker container.
Now we will login to the container with:
# Log in to the docker container.
# If your user is not part of the docker group,
# you may need to use *sudo*
docker exec -it lost bash
After a successful login we can start the pipeline import. For this import we will use the lost command line tools. To import a pipeline project we use a program called import_pipe_project.py. This program expects the path to the pipeline project as argument.
If you copied your pipeline project to /home/my_user/lost/data/my_data/my_pipe_project on the host machine, it will be available inside the container under /home/lost/my_data/my_pipe_project.
Note
It is just a convention to place your pipelines that should be imported into the my_data folder. Theoretical you could place your pipeline projects anywhere in the lost_data_folder, but life is easier when following this convention.
Let do the import:
# Import my_pipe_project into LOST
import_pipe_project.py /home/lost/my_data/my_pipe_project
The import_pipe_project.py program will copy your pipeline project folder into the folder /home/lost/data/pipes and write all the meta information into the lost database. After this import the pipeline should be visible in the web gui when clicking on the Start Pipeline button in the Designer view.
Update Project
To update a pipe project you need to perform the same steps as for the import, with the difference that you need to call the update_pipe_project.py program:
# Update my_pipe_project in LOST
update_pipe_project.py /home/lost/my_data/my_pipe_project
Remove Project
If you want to remove a pipeline project from you lost instance, you can use the remove_pipe_project.py script. After logging into the container, perform:
# Remove my_pipe_project from a LOST instance
remove_pipe_project.py /home/lost/my_data/my_pipe_project
Note
You can only remove pipelines are not already in use. Since your data would get inconsistent otherwise. If you like to remove a pipeline that was instantiated, you need to delete all instances of this pipeline first.
Managing Label Trees
Sets of labels are managed in label trees. See Figure 1 for an example. The LOST command line tools support the import of a label tree from a csv file, the export of a label tree to a csv file and to remove a label tree by its name.
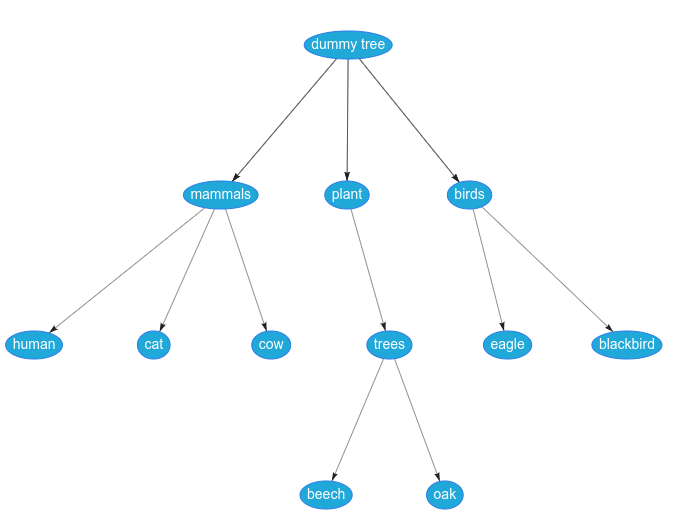
Figure 1: An example label tree. As it is visualized in the web gui.
Import Label Tree
Before you can import a labeltree, you need to define it in a csv file. See Figure to for an example of such a tree definition. For more examples navigate to lost/backend/lost/pyapi/examples/label_trees in our GitHub repository. Each leaf in a tree represents a label, while the root is the tree name and can not be selected as label during an annotation process.
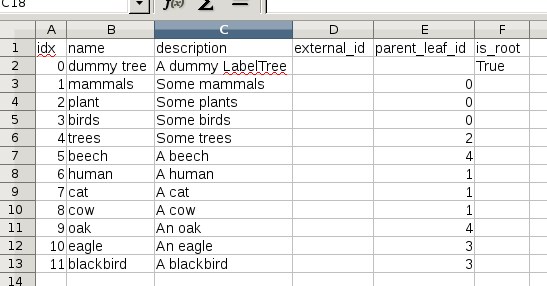
Figure 2: CSV representation of the example label tree in Figure 1.
When you have created your own label tree (lets assume you defined it in my_labeltree.csv), you need to copy it to lost_data_folder/my_data/:
# Copy your labeltree definition the LOST data folder
cp  my_labeltree.csv path_to_lost_data/my_data/
Now your csv file can be accessed from inside of the docker container. In order to import your label tree, we will login to the container and call import_label_tree.py:
# Login to the lost docker container
docker exec -it lost bash

# Import the label tree from your csv file
import_label_tree.py /home/lost/my_data/my_labeltree.csv
The label tree should now be visible in the web gui.
Export Label Tree
If you like to export a label tree that you have created with the lost web gui to a csv file you can use export_label_tree.py.
For now we will assume that we want to export the tree presented in Figure 1. Its name is dummy tree (name of the root node) an we want to export it to a file called exported_tree.csv. To do that we need to perform the following steps:
# Login to the lost docker container
docker exec -it lost bash

# Export a label tree to a csv file
export_label_tree.py "dummy tree" /home/lost/my_data/exported_tree.csv
In the host machine the exported_tree.csv will now be visible at lost_data_folder/my_data/exported_tree.csv.
Remove Label Tree
You can remove a label tree from LOST by calling remove_label_tree.py inside the lost docker container. A label tree can be identified by its name. So if you like to remove our example tree from Figure 1 with name dummy tree, you need to perform the following steps:
# Login to the lost docker container
docker exec -it lost bash

# Remove a label tree by name
remove_label_tree.py --name "dummy tree"
Note
A label tree can only be removed by the cli, if no label in this tree is used by a pipeline instance in LOST.